
In my early days as a consultant within Microsoft Technologies, I had complete lab environments running as virtual machines on heavy workstation laptops. As I have migrated to a cloud-first philosophy through the years, my lab environments have followed along. Working mainly with Microsoft 365 and Microsoft Endpoint Manager, my lab environments are now cloud-based.
I still remember deciding to move from high-performance laptops hosting all my virtualized lab environments. Looking back to my first switch to a lightweight Surface, I don’t regret it. The new lightweight devices powered by the cloud have been fantastic in my everyday work life. But – I still need environments to test and verify technologies and ideas before putting them into production. This blog post will cover ways to build lab environments for cloud-based Microsoft solutions.
Table of Contents
Tenant
We will find a tenant at the heart of every cloud-based Microsoft environment. A Microsoft tenant represents an organization. An organization or app developer receives a dedicated instance of Azure AD at the beginning of a relationship with Microsoft. Each Azure AD tenant is distinct and separate from others with its own identities.
Every company using Microsoft cloud services has its tenant. To create a lab environment, you have to create your own tenant where you can play and test ideas before implementing the solution in production tenants.
The prerequisite for creating a tenant is an Azure account that has an active subscription. You can create an Azure account for free with access to free services and a start credit for Azure. Remember that you can have credits to use in your lab environment tenant from Microsoft developer subscriptions or other benefit programs. These credits can become handy if you are building a long-term lab environment.
I often use https://demos.microsoft.com to access a short-term tenant with provisioned content quickly. This is a great base for testing concepts, scripts, and ideas without interrupting other long-term lab environments. I can quickly get a 90-day or 1-year environment, which I find ok for running labs. These tenants include the latest services and content at the time of provisioning. 1-year tenants can be extended and are an excellent choice if you want to test and learn things in hybrid environments. If you create a Quick Tenant, it will be immediately available with demo content to showcase and test the Microsoft 365 concepts.

You will get separate credentials for a Global Administrator account for each tenant you create.
An alternative is to create a Microsoft 365 Developer tenant, which is good for 90 days and can come pre-provisioned with sample data packs. Dan Usher has a decent description of getting started with your developer tenant. Going this route will give access to Azure credits.

One challenging part of the Cloud LAB is the Azure credits. The following post enlightens some approaches to getting fresh Microsoft Azure Credits: 6 tips and tricks to get free MS Azure credits | Hystax.
Endpoints
With a focus on Microsoft Endpoint Manager, it is obvious to have access to several endpoints to run tests on. We can do a lot of tests on virtualized endpoints. This brings me back to running virtualization on my laptop. Sometimes, we need access to physical devices in the lab environment. This depends on the operating system or the operation we want to test in the LAB.
Hyper-V
I am using Hyper-V on my physical computers as the environment for my virtual endpoints in my LAB environments. Hyper-V is Microsoft’s in-house virtualization solution, and it lets me create several virtual machines and run them on virtual hardware. This can give me several isolated test devices for my LABs.
Hyper-V is available as an optional feature on Windows 11 Pro, Enterprise, and Education, and one prerequisite is to enable hardware virtualization in the BIOS. Once this is in place, Hyper-V can be turned on in the operating system without installing third-party tools like the alternative VirtualBox, VMware Workstation, or likewise.

After enabling Hyper-V you need to reboot your host computer. Now you are ready to create new virtual machines inside Hyper-V Manager.

Please be aware that these machines will use resources from your physical hardware, and you need to fulfill the minimum requirements for your guest operating system. For instance, if you plan to create a VM hosting Windows, you must meet the hardware requirements described at aka.ms/WindowsSysReq. This can limit how many VMs you can run at the same time.

You can now boot the machine and use it like a regular endpoint in your LAB tenants testing AutoPilot onboarding, application distribution, device configurations, and so on.

You will now get your Windows device up and running in your virtual environment.
The Bitlocker Challenge
Please remember to eject your ISO installation medium if you plan to pilot on Bitlocker since encryption will not start while you mount removable media. Lesson learned 😎
The RDP Challenge
You might experience a problem connecting to your virtual device with a message saying you need the right to sign in through Remote Desktop Services.

You can bypass this without giving RDP access by turning off “enhanced session mode” in the Hyper-V settings on your host. More information on this is available in the following Microsoft documentation: Share devices with Windows virtual machines | Microsoft Learn
Physical Endpoints
We might need physical endpoints to test certain operations even if we have virtual endpoints. This is typically a place where you can reuse your old devices lying around. The following list is an example of situations where you might need a physical device:

- AutoPilot self-deploying mode is not supported in Hyper-V environments, as stated in the documentation, meaning you need a physical device in your LAB to work with this technology. The self-deploying device must have a physical TPM 2.0 chip. Devices with virtual TPMs (Hyper-V VMs) or TPM 1.2 chips don’t work with self-deploying mode. This will throw the 0x800705b4 error.
- Foreign operating systems not supported by the Hyper-V hypervisor might force you to have physical devices.
- Android
- iOS
- ipadOS
- macOS
- Linux

This means you need access to a decent amount of devices, power outputs, and space on your desk to hold these devices. Maybe you need cabled network access as well to some devices?

Be sure you can work in an orderly and systematic way with your physical endpoints. Arrange your space as well as possible. Maybe you need a KVM solution, or you can use your main monitor with several endpoints connected as described in my blog post on unboxing a Philips P-Line 499P9H 49″ DQHD SuperWide monitor. This monitor has both KVM and MultiView possibilities, which are useful when working on physical endpoints in LAB environments.
Isolation
You will also need to work on the LAB environment directly from your workstation, signing in to different portals etc. When doing this, working from isolated environments may be a good idea. This can be solved in different ways.
Windows Sandbox
Windows Sandbox provides a lightweight desktop environment to run applications in isolation safely. Software installed inside the Windows Sandbox environment remains “sandboxed” and runs separately from the host machine. A sandbox is temporary. When it’s closed, all the software, files, and the state are deleted, and you get a brand-new sandbox instance every time you open Windows Sandbox.

Windows Sandbox is a great place to test scripts, PowerShell modules, installations, and such before implementing them in my online LAB environments. Windows Sandbox is enabled as a Windows Feature in the same way as Hyper-V, and you will easily find it by searching your start menu for Sandbox.
InPrivate/Incognito
If you need to log in temporarily and administer multiple tenants or user logins when working in the Office 365 portal, the Incognito/InPrivate mode is much used.

This will give an isolated browser session. This is a valid solution that works pretty ok. Still, sometimes browser issues can connect you to a different user or tenancy – especially if you already had used the incognito mode on another tenant without signing out. This can cause issues if you start administering the incorrect tenant.
Browser Profiles
If you frequently administer a set of Tenants, the best solution is to set up a separate browser profile for each environment.
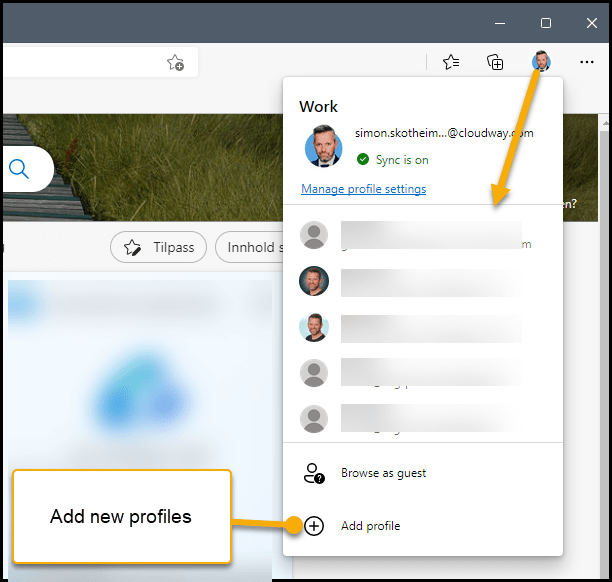
With profiles, you can keep all information like bookmarks, history, passwords, and other settings separated. You will be more productive and secure by setting up a separate profile per tenant in your frequency. This way, you can be signed in on several tenants simultaneously, unlike incognito, which only deals with one environment at a time. The most popular browsers like Edge and Chrome have this feature easily available.
Why a LAB?
A LAB is your area where ideas, concepts, development, research, and innovations are tested and validated before it reaches production. A detonation chamber for your experiments. This should be your second home, where you experiment and grow yourself.

The LAB will allow you to complete courses, certifications or learn new programs and features. The uses of technology for teaching have evolved, and so must the design and configuration of your lab – it must transform into flexible, technology-enhanced spaces for maximum effectiveness.
Start building your lab today and expand your horizons to new areas. Use docs.microsoft.com and the community for inspiration on where to go today.
#neverstoplearning
[…] The feature is rolling out in these days, and I have tested the feature on one of the tenants in my demo environment. […]
[…] I will use OpenSSL to create my required certificates. There is a good description for the process of installing OpenSSL here: How To Install OpenSSL on Windows – TecAdmin. I often tend to do such stuff in Windows Sandbox as described in my previous blog post on creating a LAB environment: Simon does… Building a MEMpowered LAB environment (skotheimsvik.no) […]
[…] This can be seen in the following image captured on an AAD-joined device in one of my test environments: […]
[…] shared as it is – use it at your own risk. It might be wise to test run the routine in a lab environment before putting it in production.Thanks for reading – please share and […]
[…] Please note: One prerequisite for a self-deployed Autopilot onboarding is a device with a physical TPM 2.0 chip – no virtual TPM as stated in my blog about my Intune LAB environment. […]
[…] a year ago, I eagerly initiated a Microsoft 365 demo tenant, envisioning a platform to test innovative ideas and immerse myself in cutting-edge technologies. This platform has served me well as my playground for experimentation. In this journey of […]